Monday, October 9, 2023

Just us Girls Challenge #700

We are invited to celebrate the 700th challenge with the folks at Just us Girls this week!  And I could hardly wait to get started on my card using Lisa K.'s colors! 


Inspiration abounds from their design team every week - this week I was smitten by the birds Elizabeth shared with us - here is where her card took me today...

Grey is my neutral today - navy is a blue after all!  I nearly forgot the kraft/tan - I was
really happy how this panel looked mounted on a kraft card base.

I have been wanting to make another of these gorgeous Cranes ... the colors in the challenge worked out great for it.  As Elizabeth's card has honored those with cancer, mine will be heading to a dear friend who is waging her own battle with it.

Congratulations, to the entire JUGS team - I'm delighted for you and look forward to another 700 challenges!
=] Michele

Altenew: Red-Crowned Crane layering die set
Lil' Inker's wood grained cover plate - no longer available
EH: Landscapes die set
Spellbinders: Betterpress - A Little Message sentiment plates


Sunday, October 8, 2023

Peace on Earth Christmas Challenge #49

Do you have favorite Christmas supplies that come out every year?  I sure do ... here is one of them: those darling deer from PTI: Deer to Me*!  This year they are a decoration in front of a new door from The Greetery called Elegant Entrance Arches!  I'm hoping we'll have the time to add a new paper house to our display this year - and use that gorgeous door!  I found beautiful inspiration from the Peace on Earth Christmas challenge #49.


I die cut the door from a deep charcoal card then used the 'cutouts' to do a little stonework around the doorframe.  My glass is a wonderful, flocked vellum from my friend Cat - thanks again, my friend!  I love the memory of doing this with stencils on our front window!  Does anyone remember the liquid that we used to do it?  

An arched die from Waffle Flower was used to cut an arch from my card front about the same size as the window in that door to allow light to shine through.
I've attempted to capture that here:


The die comes with 'door handles' but I cut two extras, clipped them in half-ish and used them to create 'hinges.'  Wouldn't I love a front door like that one! 
 

We were off gallivanting during Saturday's World Card Making day - hope you all had lots of fun!  
=]
Thank you!!  Such an honor!


*the berries and pine here are from PTI's Simply Snowmen set - more of that soon!

Thursday, October 5, 2023

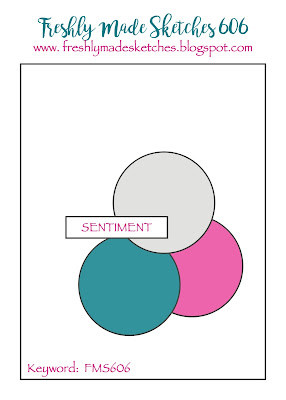
Freshly Made Sketches #606 and Color Hues #73

Hello, my friends!  Don't think for one moment that I'm done playing with those sweet little skaters from WF's Winter Fun set... they are so sweet and very quick and simple to color!  

I've created a skating pond and used both Narelle's Sketch from Freshly Made Sketches, and colors from Color Hues #73 this time...


See that little snowdude?  he's on a magnet and can spin all day!


Here are the Copics I used for my Color Hues of Coral and Blue!
That Joy was stamped with CP Tutti Fruity ink. 


I was very happy to use my old Lil' Inker's swirly die plate for my pond today - I have missed it!

=] Michele


Wednesday, October 4, 2023

CASEing Bobby and sharing it with a Group of Seven Cardmakers!

Which came first?  The Group of Seven members have been tempting me with their fabulous makes using a technique that I was dying to try - then Bobby used it for her JUGS #699 card!  It doesn't matter, as I made TWO cards so I can send one to each! Well, that was my intention...  NOTE TO SELF: read the directions!

When a girl has more than 100 embossing folders, it can be tough to choose just one to play with ... thus the reason for TWO cards.  Let's start with the one I am sharing with JUGS' CASE the Designer challenge, shall we?  

Here are the inks I chose...


I found the wonderful Alstroemeria Bunch Folder and Die combo from
SSS on the cheap - I've been admiring my friend Bonnie's use of it long enough!  

The video Bobby shared on her post used Distress Oxide inks which were
blended onto a panel of paper randomly.  AFTER dark ink was applied to the debossing side of the folder, the piece was placed inside the embossing folder and run through the machine.
The results I had were not perfect... the ink kept beading up on the plastic folder... but perfection is in the eye of the beholder and my husband saw a wonderful 'pointillism' to the resulting background!
I agree and thought it was the POINT of CASEing - to change a few things, right?
The ink colors - check.  The folder - check. The color of the background and
the resulting fun that resulted from using a dye ink rather than a pigment ink!


Okay.  My card for the Group of Seven is all wrong!  It was supposed to be done using water coloring with the inks!!   I'm sorry ladies!  But I'm sharing it just the same - kind of a 'don't do as I say or do' kind of thing!  I'll do better next time!

Altenew's Beautiful Bergenia embossing folder, three different colors, and VersaFine Clair Nocturne ink...


I found the best way to clean that embossing folder after playtime was to use liquid laundry soap directly to the folder, scrub with a soft nail brush, and then with warm water added.  Clean as a whistle and ready to play again!

Off I go to enter my cards - thanks for stopping by!

=] Michele

The Flower Challenge #85 - our 7th birthday!

Yes, you read that right - we are celebrating seven years of challenges using florals at The Flower Challenge and we want to make sure it's extra special by inviting YOU to party with us!


Since it's a birthday party one might think I'd have made a birthday card - nope!  Our challenge for this month: Mix or Match - stamp sets, dies, or companies!  For my card, The Greetery + Pinkfresh Studio came together seamlessly to add to my Christmas card stash!  Don't believe me?  Take a look at my card...


Here are the inks I've used for stamping today - I like that I 
didn't use one bit of black on my Christmas card!


It all began by stamping a few images from Pinkfresh Studio's 
Modern Layered Florals
in these dusty greens right onto my card base.  I then added two sprays of greenery and berries from The Greetery's Merry Sprigs - popped up for a little dimension - and stamping the berries in red for a little POP of color!


This wonderful sentiment can also be found in that set.  I've chosen to keep my cards as 'one layered' as they can be this year to help with postage - stamping my sentiment right on the card base helps with that.

SO, no matter what kind of card you make or whose products you combine - please be sure to use flowers as your main focus!  We can't wait to see you in our party gallery before October 25th!  We have another new teammate, and some wonderful guests this month!  Our design team has so much to be inspired by - let's go see, shall we?  Before you go, along with this happy celebration comes some not so happy news... 

Sadly, we are saying goodbye to Aileen who because of her love of flowers, started all the fun seven years ago, and to Viv who has stepped in when Aileen needed her!  All my love to you both for all the wonderful leadership you've shown this team ... I will miss you both dearly! xx

=] Michele

Monday, October 2, 2023

Just us Girls #699 - CASE a Designer!

It's my pleasure today to CASE one of the Just us Girls' designers - my friend, Lisa Elton!  Challenge #699 is a fun one!  

Here's Lisa's beautiful card... 


I happened to have ONE more of the beautiful washi wreaths, and one little bouquet that I was treated to left in my stash - a perfect time to use them!  They have shades of pink and green!


I trimmed the wreath to place in the corners as Lisa has done and cut the bouquet in half to 'fill in' the spaces along the edges.  I chose a panel of woodgrain cardstock for my card front and used a lovely die-cut wreath from The Greetery under those washi pieces to elevate my card - it is a Christmas card after all! 


While Lisa stamped her sentiment in one corner, I used two of those little Pinkfresh sentiment banners to decorate two!

Let's see if I followed that CASEing rule [change at least 3 things] I mentioned recently:    
    1.  I brought my design right to the edge.
    2.  I stacked my decorative die cuts but kept the round shape of Lisa's wreaths.
    3.  I made it a Christmas card!
    4.  I added texture to the base.
    5.  Two-part sentiment + a little bling!

There you have it:  CASEing complete and I think I preserved the beauty of Lisa's card - don't you?

I've come to that time of year when if I make one Christmas card, I make a second!  My box of cards for those seniors still looks mighty empty!


Thanks, Lisa, for the gorgeous inspiration!
=] Michele

Sunday, October 1, 2023

SURPRISE! Case me a Christmas card!


I so was happy to be invited by a fun group of Instagrammers who planned a wonderful surprise for Michelle Lupton!  For a few years Michelle has invited one card maker per month from October to December to play cards!  Each of them chooses one of the others' cards, CASEs it, but turns it into a Christmas card!  I never had the pleasure but have always enjoyed seeing the cards that were created by Michelle and her guests!  

BTW if you would like to join us, just go to Michelle's blog, choose one of her cards to CASE then share your card on Instagram using the hashtag:  #casemeachristmascard2023

Okay... ready for my card?  First, let me show you the card Michelle made that I'm CASEing:


I know, I know - how do you take a sympathy card and turn it into a 
Christmas card?  Here's how:

Use similar colors, use a die cut, and well - add a Christmas sentiment!

Here's how that turned out for me...


A similar color palette - I just switched the brown for my favorite grey!  

I started by masking off a strip of my card panel to accommodate some gorgeous, blended teal color, and over-stamping with The Greetery's Pretty Postmarks stamps loaded with the grey ink and spritzed with water before stamping on a diagonal.


My die-cuts?  One of my favorite Poinsettia's from The Stamp Market 'kissed' with just a touch of Lagoon ink and adding a few pine boughs from HoneyBee's - Winter Greenery. Before putting it all together I gave all my die cuts a spritz of Wplus9's Shimmer spray mist - my homage to Michelle's embellishments!

Last but not least I added a die-cut Christmas sentiment instead of stamping it onto my card base.  This one is just one of 12 in the newest sentiment set from Pinkfresh Studio's Basic Banners collection.  All of the sentiments are stamped at once, then all are cut at once using the coordinate die.  Who doesn't need to save a lot of time while creating Christmas cards?  I have pre-made enough for dozens of cards!

So, what do you think?  Ready to play along?  If you have any questions, please email them to me - you'll find my email in my blog profile.  Even if you don't you can follow along at Instagram - just search #casemeachristmascard2023 and all of the participating card makers' creations will be there!

Thanks for stopping by!
=] Michele