Friday, June 30, 2023

Doodlebugs Friday!


You have undoubtedly heard that good things come in small packages?
It is the same with small stamp sets!
Enter Altenew's Apple Blossoms Layering stamp set and coordinating dies! Here comes my sneaky peek - all I'm sharing are the inks:


And here is my set up for layering these darling blooms and leaves:


Please tell me you're curious!  I'll share it all over at the Doodlebugs Blog HERE!
=] Michele

Tuesday, June 27, 2023

Just us Girls #685 CAS Thinking of You

Hello.  My name is Michele, and I am addicted to CAS.  Clean and simple is my favorite of all card style.  Oh, I go a little overboard on occasion, but if a challenge asks for CAS, you'll find me playing along!

Take the challenge from Just us Girls this week:  CAS and thinking of you!  That's my favorite card of all!  lol 


I've kept my card design one-layered - this Spellbinders' die cut hemstitched circle detail was cut from the card front!  The smallest Honeysuckle Stem from The Greetery was layer-stamped right on the front, too - and my sentiment?  stamped using one of the inks I used in the stem.  As simple as that!

The JUGS DT have so many perfect illustrations of CAS you won't have any trouble being inspired - go. see. play!  Thanks for dropping by!

=] Michele 

Monday, June 26, 2023

How I use my Altenew StampWheel and get amazing results!

Hello, my friends!  I'm hoping my experience with my new Altenew StampWheel will inspire others who have added it to their own cache of crafty tools.  When I decided to purchase one, I was apprehensive - stamping platforms are not inexpensive!  I had a specific task in mind:  how can I use it to stamp multiple COMPLETE florals using the many MANY layering stamps I have in my arsenal! 

Are you curious?  I hope to show you as simply as possible with my photo tutorial.  If you have any questions - you can leave them in the comments, WITH your email address and I'm happy to help!

Let's get started:

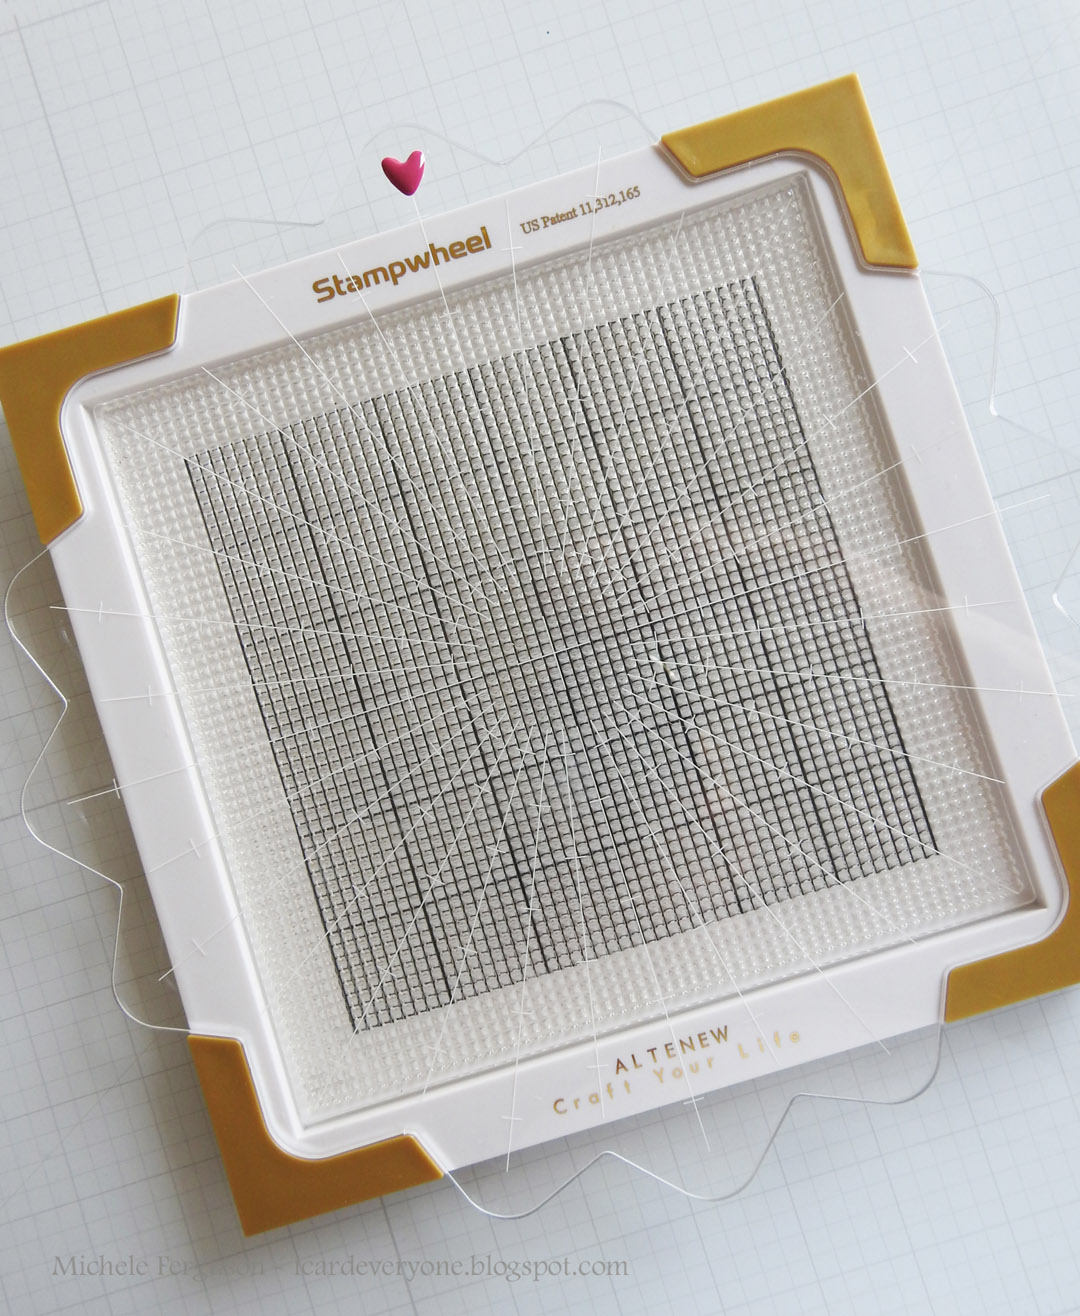
1. Right out of the box, I knew I wanted grid lines.  Altenew packed the 'sticky stamp mat' that fits into the platform with protective film - one had just the grid lines I was looking for - just a little trimming around the edges allowed me to find the center of the platform before adding the sticky mat over top.  


I measured and fiddled with it until the grid, the sticky mat, and center point of the Wheel all aligned.


Next, I added one of Altenew's darling enamel hearts to indicate the top center position of the Wheel - that does come in handy, and I'll point out why very soon.  

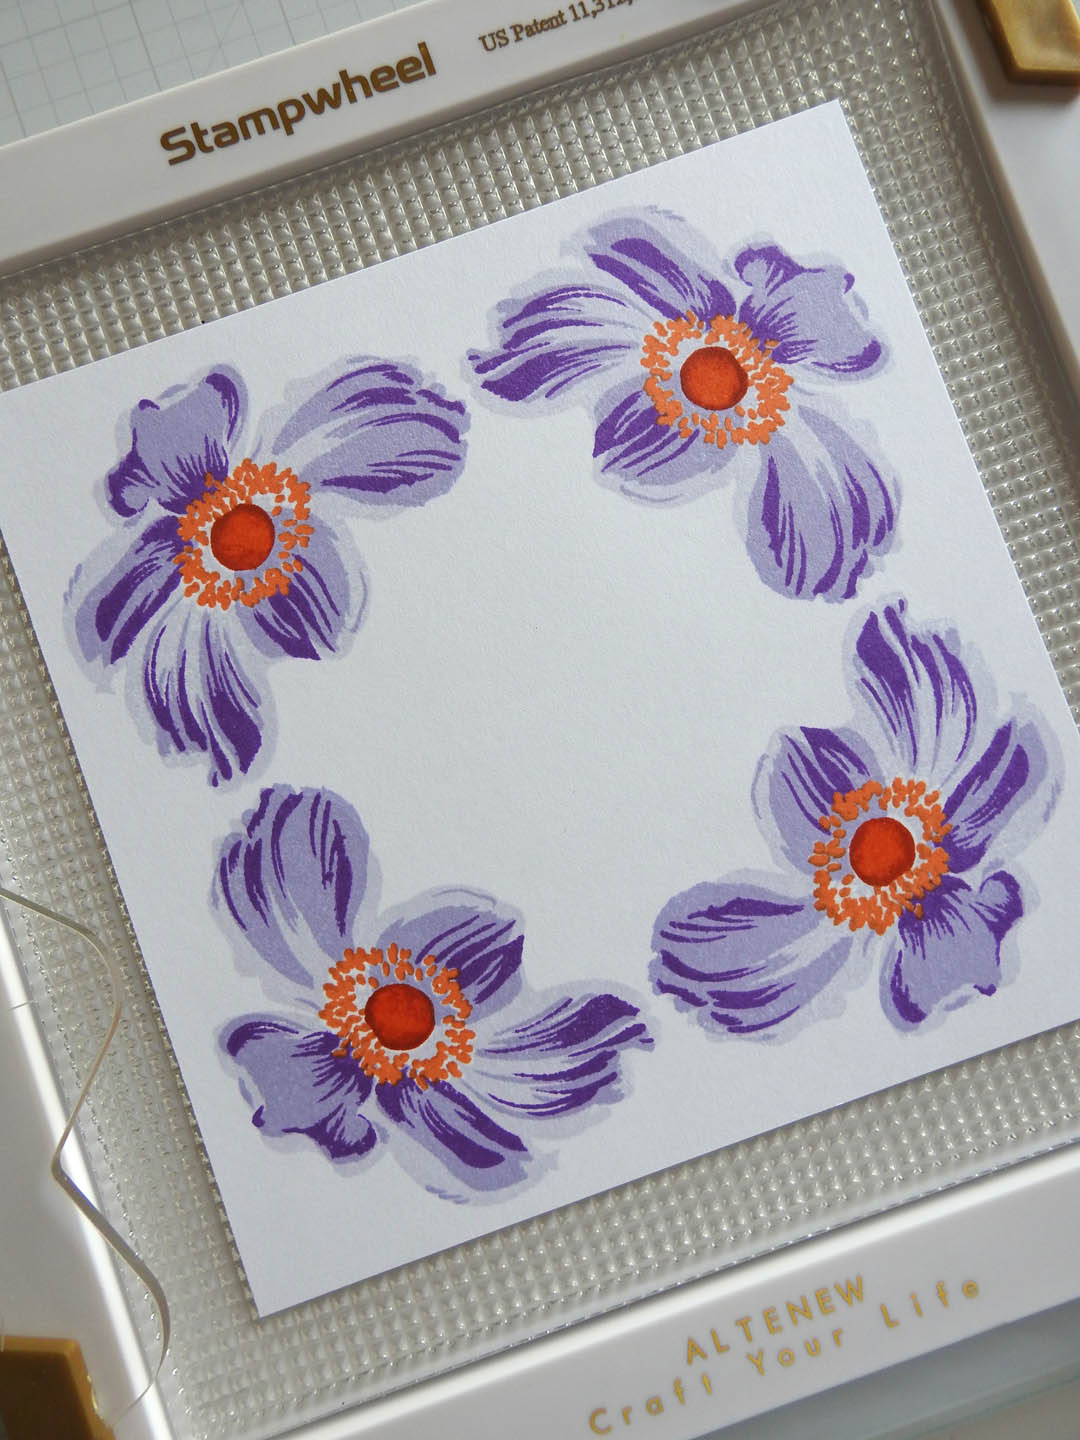
2.  Choose a layering stamp set from your stash - oh, I know you all have at least one!  Today, I'll play with their Build-a-Flower: Anemone.  You'll see there are 5 layers that 'color' the bloom, and an outline if you choose to use it.  I won't show the leaves for my first set of blooms.  


3.  I will start my stamping journey by 'sticking' a 6x6 inch piece of 80# Neenah card onto the mat - I use the grid, but I also have a homemade guide [thank you Tom] to make sure that it is indeed centered. [Altenew knew this would be handy and I have their set coming soon!]


Then I position the first layering stamp of my Anemone - the most solid of all - and choose some pretty inks to work with that have different shades of the same color.


It's also important to note that there must be room on the square for that first layer to be stamped four times.  I made sure of it and found a six-inch square works for most of the layering sets I have.

4.  Pick up the stamp with the Wheel with that marker at top center position, and remove the centering guide.


Flip the Wheel over, ink the stamp, and flip again to stamp in the 1st position then repeat this process moving that enamel heart to the right center, bottom center, and left center - inking and stamping as you go ...


until you achieve four perfectly stamped Anemones...


I mark this first layer stamp as '1' using a scrap of post-it tape.

5.  Now, align the second layer stamp right over the first one stamped - just like you normally would by using the handy guidelines included in the instructions for the stamp set. 


BUT this time you are keeping the first stamp ON the Wheel - just pick up stamp layer 2 with the enamel heart in the right center position!  Label as layer 2 with another post-it.  


Stamp with the next darker ink and repeat until you've stamped layer 2 on each of the four Anemones!  Here's how that looks:  
 

6.  The third layering stamp is lined up over one Anemone and stamped with the darkest of the purple inks... but here's the beauty of this flip Wheel:  I can use BOTH SIDES OF IT!  So I choose to pick up layer 3, 4, and 5 on the reverse side of the Wheel to make inking a little easier!  Just pay attention to where that little pink heart is, and you'll always know which is the front and back side of the Wheel you're on.  


It's KEY to label the stamps as you go...


Just in case you want to add a little shadow layer as I have done - SO easy to do
because you know it will always be aligned perfectly!


Ready for the reveal??  FOUR completed blooms...


BONUS:  I am now set up for stamping four more using the numbered post-it labels as my guide:

Side A

Side B - layers 6 and 7 are the leaves - which you'll see in the following...

It works SO well I decided to time myself for my second batch of flowers:


Less than 12 minutes and that includes two leaves, AND the outline!


SO quick and simple!  Goodness - it took me the rest of the afternoon to design three cards!  

Have your eyes glazed over??  I wouldn't blame you!  I'm so sorry that I don't have the equipment, or confidence to make a video for you, but hope that I've explained my process well enough that you can try it with YOUR own StampWheel!  

Thanks for your time today - now I guess I'd better get that laundry started!
=] Michele

I have to thank my wonderful friend Therese of Lost in Paper- she sent me a very generous gift card for helping out with her LIVES on YouTube - because of that, and a little extra out of pocket I was able to spoil myself with this fabulous tool!  Thanks, Therese!  HERE is her affiliate link to YOUR next fabulous tool!  Thanks so very much, Therese!

Friday, June 23, 2023

Doodlebugs Friday!


I'm up over at the Doodlebugs blog sharing my experience with a stamp made by Altenew especially for their new stamping tool - however I hadn't yet received my Stamp Wheel - here's how I managed to make it work just perfectly!

Here's one of my FINISHED CARDS! How's that for a not-so-sneaky peek?


Hope you have a moment to stop by - I promise to share all my tips and tricks with you right HERE!
=] Michele

Thursday, June 22, 2023

Freshly Made Sketches #591 NBUS #51

I found another two stamp sets that hadn't seen any ink at all before today - no excuses as they are both just wonderful and could be used for this week's Freshly Made Sketches from Jen Brum...

This first card really sings Jen's Sketch in a fun way, I think.  It uses those old dies from SSS, some pretty cardstock from The Stamp Market, and a set from SSS called Hello Sunshine:


Does anyone remember this SSS Circle on a Line?  I swear I never
throw anything away!  Including that orange-red circle I found in the package!
After piecing all the sections together, I was brave enough to stamp that
sunny face over the top with versamark ink and gold embossed it - phew, that was scary!  Another fun sentiment was stamped in versafine ink, clear embossed, and cut into a little flag.

My second card I thought might also fit the Sketch - can you see it? - but since it also uses a new to me set, I'm sending it over to my friend Darnell for her NBUS challenge #51.  Here you go, D - so happy to send you another card!


My favorite place to take a walk - and you'll surely find my flip flops waiting for
my return trip along the shoreline.  Isn't this a fun scene?  A set
from Stampendous/Fran's: Ocean Frames.  I think it may have been a prize from SSS?  I stamped the THREE parts of the scene in water friendly Versaclair ink and
used my Distress cubes to watercolor...


Hope you all are having a good week - tomorrow evening it is FINALLY time to celebrate my granddaughter's graduation!  Yay!
=] Michele

Wednesday, June 21, 2023

Just us Girls #684 Second helpings!

While rifling through my SSS stash for a sentiment, I happened upon these guys and immediately knew I had to make a second card for JUGS #684.


The JUGS team all inspire me but, Bobby, your umbrella inspired this card ...


SSS Chillin' Gnomes there is a combo set that includes dies, but they weren't too hard to
fussy cut - at least they didn't complain! 


Sentiment strip created using my Dymo label maker and my silly sense of humor.


Michigan is heating up for beach season at the moment - I may have to join them!
How about you?
=] Michele
Thanks, Vicki and the entire JUGS team!

Tuesday, June 20, 2023

Four Seasons - A Summer Day at the Beach!

I don't know about the beaches you all frequent, but here along the Lake Michigan shoreline one can expect to see & hear a gull or two!  Watch your snacks are the words for the wise!

The ladies at the Four Seasons June 2023 challenge are looking for anything goes Summer!  Here is their wonderful inspiration...


I recently added Altenew's gorgeous Bird of the Mountain die set and quickly determined that this stunner could be made into a mountain of different breeds of bird.  Today, I TERNed it into one of those pesky guys found on other beaches ...


The layering dies can be customized - I lengthened his tail, Copic-colored his head, and beak based on a photo I brought up on my phone from All About Birds.

Here's a closeup of his eye - it has a little dot of glossy accents.


I buried his feet in the sand with a little snip of my scissors, and
used those old faithful dies from SSS to create the sand, foam, and ocean from some white woodgrain cardstock and a few inks and daubers.
This fun sentiment is from HoneyBee Stamps' Seas the Day sentiment set.
[You'll see this guy as a different 'breed' soon!]

I better get this guy over to the Four Seasons gallery before he takes off!  Thanks for stopping by!
=] Michele

Monday, June 19, 2023

Just us Girls #684

I have always loved the idea of these little beach huts - a great place to put on your bathing suit but the best ones would have showers available to wash off the sand from one's day of frolicking at the beach, right?  

Today's musings come from this fabulous photo mood board at Just us Girls ...


Something tells me these kids don't give any notice to all that sand - you'll have to use your imagination to see that the view is FROM the huts...


This sweet little parade of peeps were stamped for me years ago by a sweet friend -
thanks, Lisa - and for your darling reminder on your DT card this week.

I was so happy Lisa stamped them in Copic-friendly ink!
After coloring the kids, I created an ocean with broad strokes of Copic markers, and then
blended over the top with CP Skylight ink.

My water's edge die is an oldie from The Cat's Pajamas and provides a
spot for a bit of Wink of Stella that I also splattered on my ocean!

The JUGS designers have provided sand-pales-full of inspiration - go see, then PLAY!  Thanks for stopping by today!
=] Michele

Saturday, June 17, 2023

Altenew Inspiration Challenge - second helpings for June 2023


I've been playing with a few more of the layering stamp sets from Altenew this week.  This one, Fresh Blooms, is reminiscent of the Deepa's Petunias - a white one would have been hard to create so I went for the purple of her color inspiration coming as close as I could with my Altenew inks and kept the greens more neutral using their Nature's Wonders collection.


I loved Deepa's garden photo, so I filled my card with lots of greenery using their Climbing Leaves cover stamp and die. This oh-so-true sentiment is from the same stamp set.

Have a wonderful weekend my friends - thanks for stopping by... I'm so touched by your kindness!
=] Michele

Friday, June 16, 2023

Guest Designer for Color Hues #66


I'm very happy to have a win so I could be invited back to Color Hues Color Challenge as a guest designer!  Oh, and it's a goody - but aren't they all? Hope you can play along!


I brought out an 'old' friend from Altenew: Enchanted Iris
stamped it with Memento copic-friendly ink and chose three shades of yellow and green from my Copic collection.


Since I stamped the flowers with the leaves I had to 
get a little clever when die-cutting.  I partially cut
the Iris's heads with the dies, then finished the job with
my scissors...


I couldn't get enough of that sunshine-y yellow, so I chose to cut a postage-edged panel from some pretty yellow plaid then popped
up my Iris and another sentiment 
from Pinkfresh Studios' Perfect Sentiments


I have to thank my friend Hilary for inspiring me to revisit this sweet set - she mentioned her Irises in her garden and my
imagination took over from there! OH and then this gorgeousness:


I was so inspired by the lemons and those darling curtains from Double D's Lemon-ade inspired moodboard!

Thank you, Color Hues, for the win, and the invitation to be your guest!
=] Michele

Supplies:
Altenew Enchanted Iris stamps and dies.
Papertrey Ink: Bitty Big patterned paper - Harvest gold
Pinkfresh Studio: Perfect Sentiments
Wplus9: Postage Layers Dies

Doodlebugs Friday!


Yes, you have seen these sweet blooms before, but I just can't stop
making them in ALL the colors!  and I found a new place to plant them
and it all can be found today over at the Doodlebugs blog!


Thanks for stopping by!
=] Michele